Pentoo Installation
Step-by-step guide to installing Pentoo Linux, a Gentoo-based security distribution, including partitioning, bootloader setup, and post-install configuration.

- Choose DD mode when flashing the USB drive with pentoo using rufus
- If using a VM, make sure your pentoo vm is set to (UEFI Boot) instead of BIOS
To change your vm firmware type from BIOS to UEFI on VMware:
- Select your pentoo VM
- Click on “Edit virtual machine settings” > Options > Advanced > Firmware type
What is Pentoo and who is behind it?: Pentoo
Shoutout to the OG Null Byte (author @distortion): Null Byte
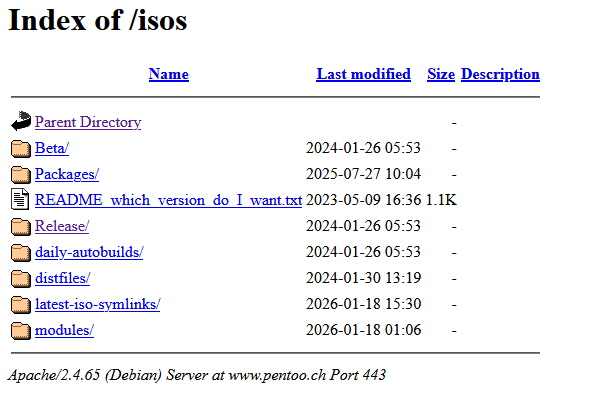
Download the Iso
First you want to get the latest iso version from the official website 
Select “Download from the main site (US)” and that should take you to this page: https://www.pentoo.ch/isos/
Before you do anything, read this README
The README file explains which architecture (amd64 vs x86) and edition (Full/Core, hardened) you should choose.
Then, Choose the Release directory
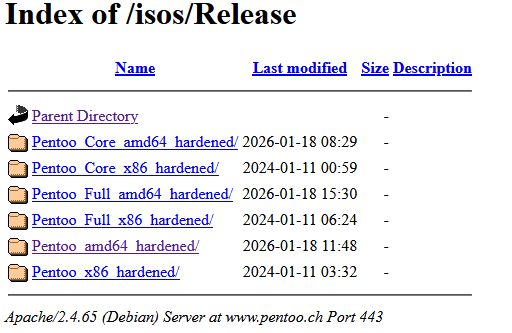
From here, select the latest Pentoo_Full_amd64_hardened ISO unless you specifically need another variant.
The
Full isovariant is usually the best choice for a typical 64‑bit installation unless you know you need a different image.
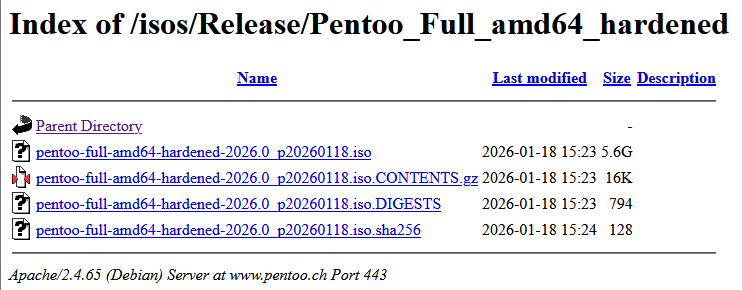
In that directory, choose the first .iso file and download it.
If the download fails, try cleaning your browser cache and downloading again.
You can also download directly from the terminal using PowerShell; since wget isn’t a command prompt utility.
1
wget https://www.pentoo.ch/isos/Release/Pentoo_Full_amd64_hardened/pentoo-full-amd64-hardened-2026.0_p20260118.iso -UseBasicParsing
For a more direct download if you don’t know the full version name
1
wget -r -l1 --no-parent -A .iso https://www.pentoo.ch/isos/Release/Pentoo_Full_amd64_hardened/
Flash the USB drive
Using Rufus (Windows Only)
Once you have the ISO, flash it to a USB drive. Use at least an 8 GB USB drive (16 GB is better).
Download Rufus from the official site
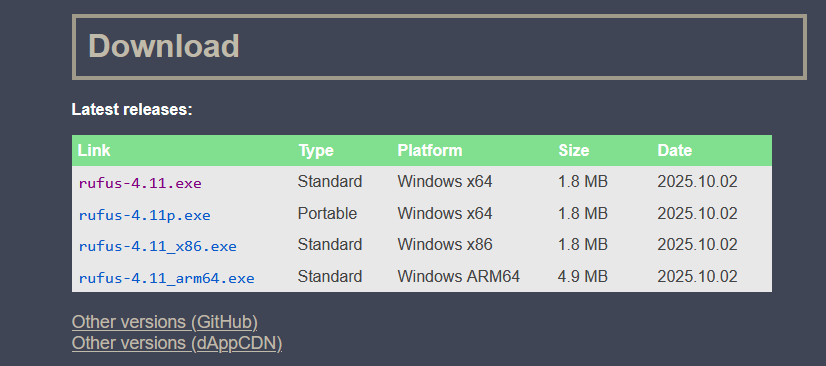
Run Rufus and:
- Select your USB drive under Device.
- Select the Pentoo ISO under Boot selection.
You want to hit
Selectto choose your pentoo iso file that you downloaded.
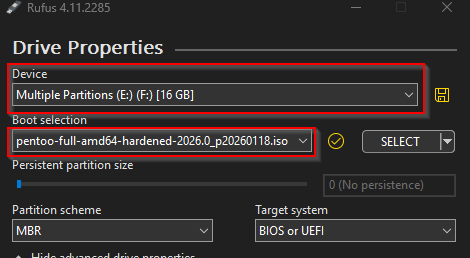
Once you have selected and confirmed that everything is good, hit Start.
You will get this pop up. Make sure you select “Write in DD Image mode”
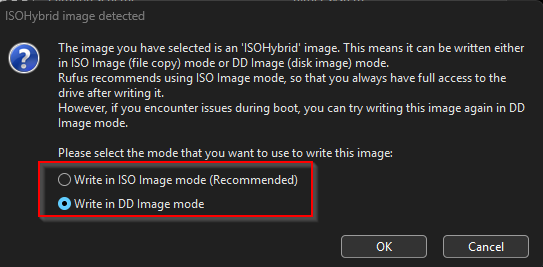
And then click OK. It should take a few minutes (about 15 min), and it will let you know when it’s done (Ready)

Using balenaEtcher (Windows or Linux)
Download it from the official website
Run it, and select the pentoo iso file and make sure it’s the usb device you want to use, then hit “Flash”
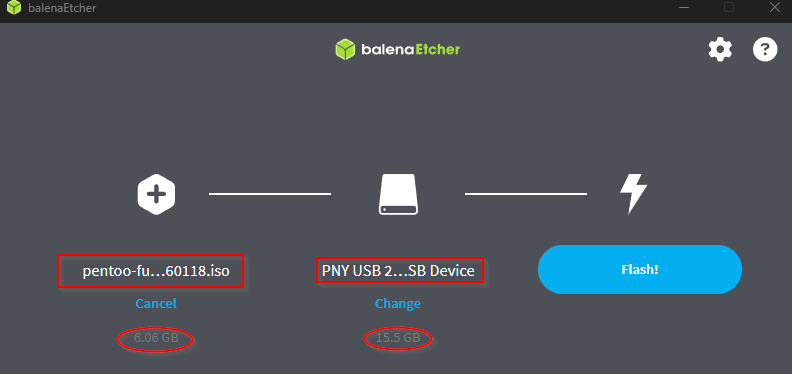
That’s it. Pretty simple
Using DD (Linux Only)
dd is a utility that works on linux only. You could find a windows port for it if you want to use it on windows or a similar low level tool for flashing usb drives from the terminal, but honestly no need. Just use rufus or balenaEtcher.
To do this from the terminal, use the dd command to write the iso directly to the USB device.
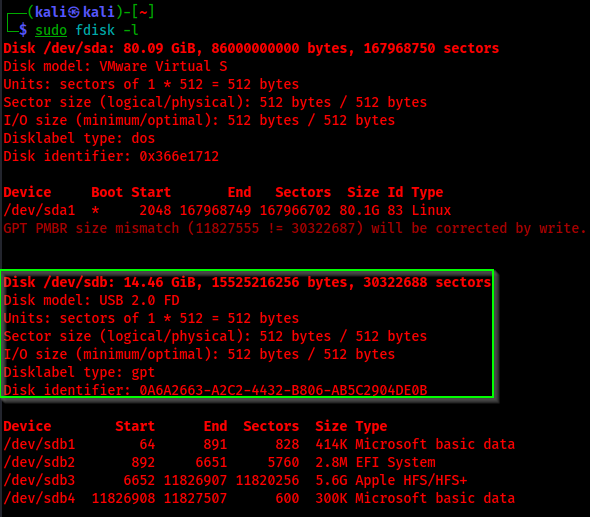
You can check and confirm your USB device. Use lsblk or fdisk -l
1
2
3
4
5
6
7
8
9
10
11
12
13
sudo fdisk -l

[...]

Disk /dev/sdb: 14.46 GiB, 15525216256 bytes, 30322688 sectors
Disk model: USB 2.0 FD
Units: sectors of 1 * 512 = 512 bytes
Sector size (logical/physical): 512 bytes / 512 bytes
I/O size (minimum/optimal): 512 bytes / 512 bytes
Disklabel type: gpt
Disk identifier: 0A6A2663-A2C2-4432-B806-AB5C2904DE0B

[...]
1
2
3
4
5
6
7
8
9
10
lsblk

NAME   MAJ:MIN RM  SIZE RO TYPE MOUNTPOINTS
sda      8:0    0 80.1G  0 disk
└─sda1   8:1    0 80.1G  0 part /
sdb      8:16   1 14.5G  0 disk
├─sdb1   8:17   1  414K  0 part
├─sdb2   8:18   1  2.8M  0 part
├─sdb3   8:19   1  5.6G  0 part
└─sdb4   8:20   1  300K  0 part
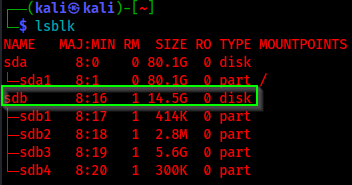
Now that you know your drive name, write the iso to the usb drive using dd:
1
2
3
4
5
6
sudo dd if=pentoo-full-amd64-hardened-2026.0_p20260118.iso of=/dev/sdb bs=4M status=progress oflag=sync

6055708672 bytes (6.1 GB, 5.6 GiB) copied, 1288 s, 4.7 MB/s
1443+1 records in
1443+1 records out
6055708672 bytes (6.1 GB, 5.6 GiB) copied, 1288.39 s, 4.7 MB/s
After it’s done writing the iso file to the usb drive, you can run sync once more just to make sure nothing was missed to avoid any corruption.
1
sync
Now, you can eject the usb device safely, if it was mounted
1
umount /dev/sdb
Otherwise, you can just unplug the USB drive.
The Installation
After you get everything right and boot from the USB drive on your Laptop, you should get here 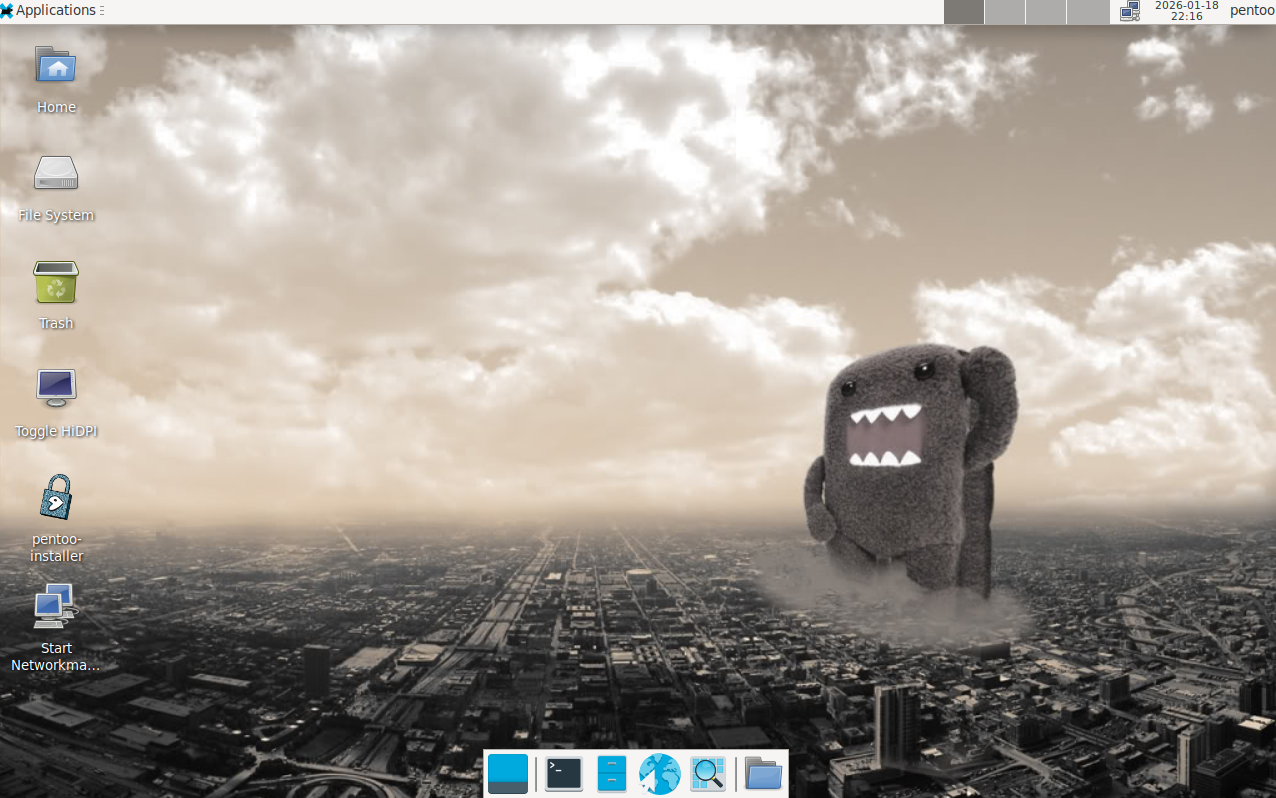
Pretty Screen!
You do not get the pretty screen when using the core iso.
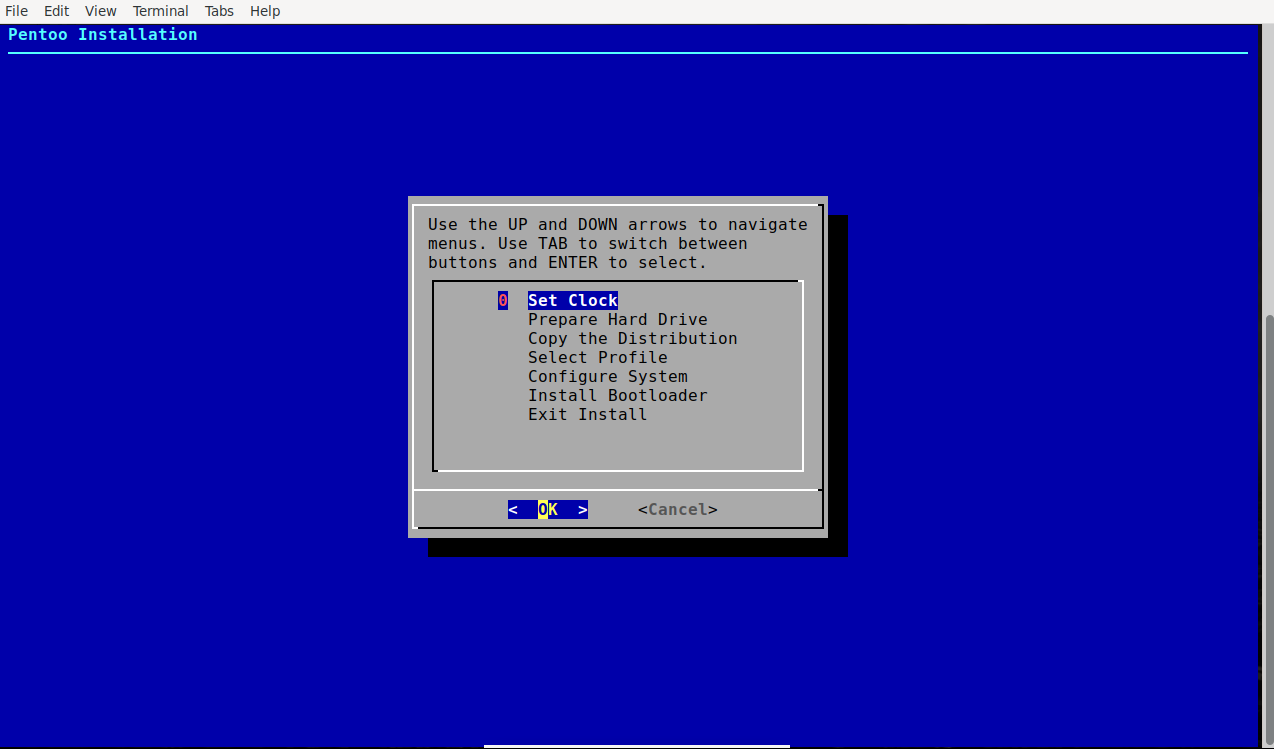
From here, launch the Pentoo Installer on the desktop. If you get the security prompt, choose “Mark As Secure and Launch” and you will land here:
If you chose core instead of the full iso, you can run the installer from the terminal using
sudo pentoo-installer.
Set your time. Choose between Local Time and UTC, straight forward. Then choose the numbers corresponding on your area. 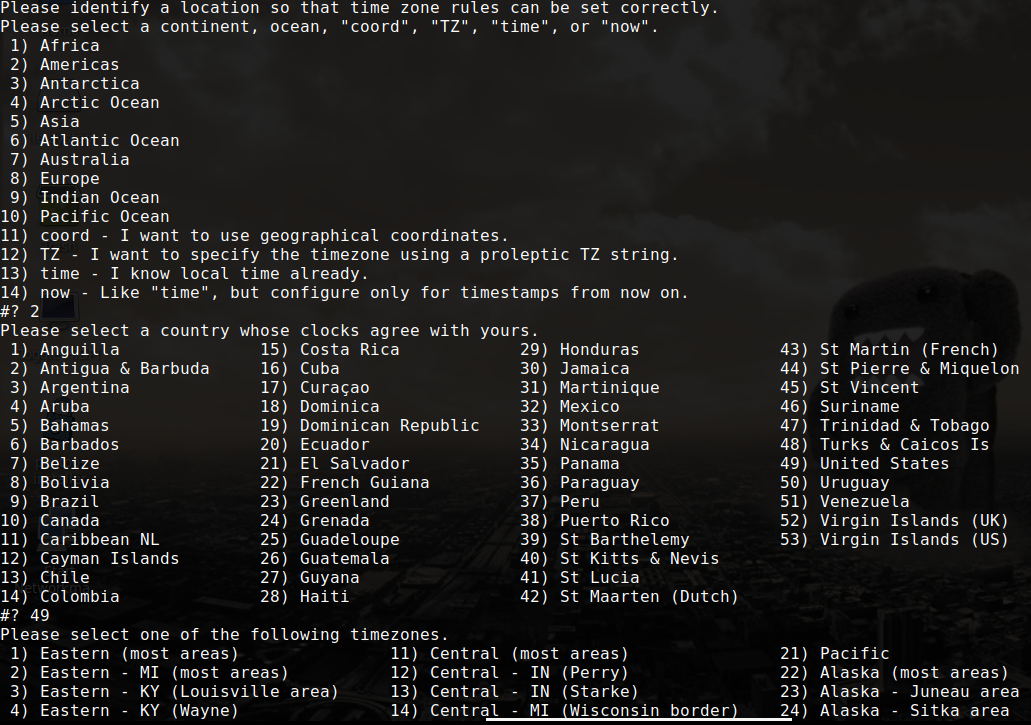
After that, there is the next step in the installation.
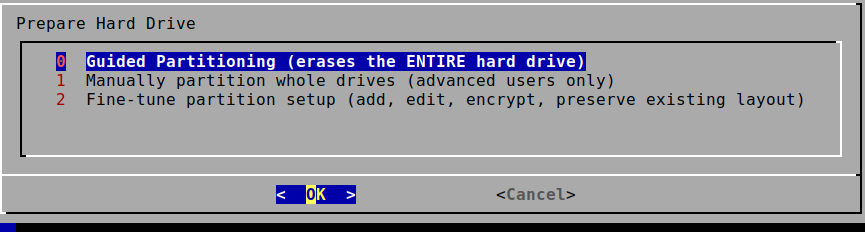
Unless you are an expert and you know what you are doing, choose the first option
When you are done, you will see a third option pop up. Select it to end this step 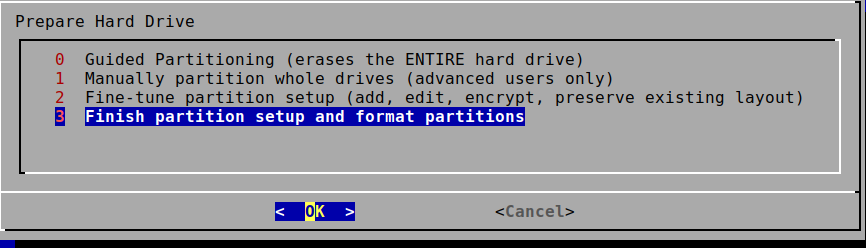
The next step will be “Copy the distribution” which is straightforward. You will get this screen after it’s done. I always choose yes, and I have never had any issue, but choosing no is safe. 
For the “Select Profile” step, I always choose 55. As quoted by Null Byte, “If you are migrating from Kali, this might be the best option as software installations will require less time and user input to complete.”
 For the next step, I choose nano, because it’s easier. Feel free to choose vi or vim if you enjoy that.
You want to pay attention to the screen after that. 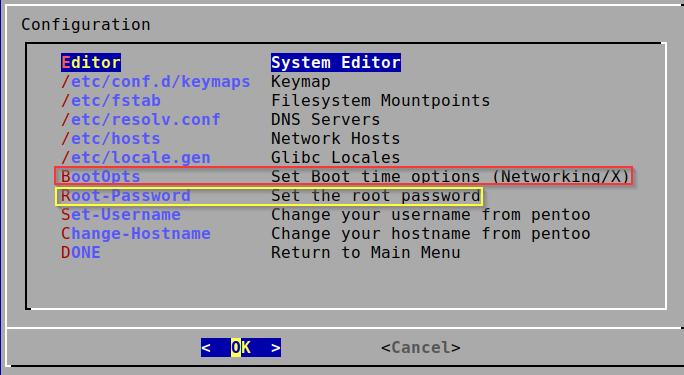
If you don’t set the root password, you can just run root commands without any password, so can anyone with access to your laptop :)
The Boot Options “Boot0pts” configuration is the most interesting 
- BootNet: enable this so NetworkManager starts automatically; otherwise Wi‑Fi and networking won’t come up on boot.
- BootX: enable this to boot directly into the GUI instead of dropping into a console.
By default, pentoo boots to the console, then you can boot into the GUI with the command:
1
startx
When you are done, Select “Done” to go back and “Done” again.
Next, install the bootloader, Select GRUB2-UEFI, that’s the default 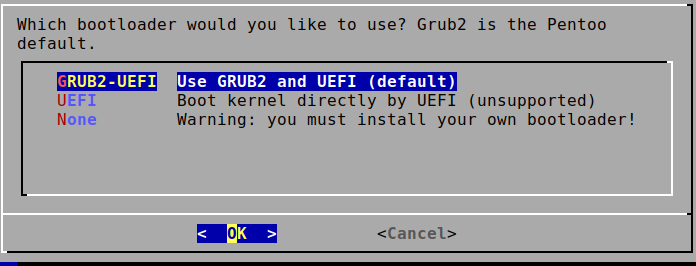
It will redirect you to the config file for Grub2, just exit for the installation to start. You can exit with CTRL+X. The installation should start right after that.
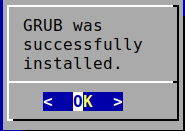
And that’s all.
Pentoo is Open Source. If you have any questions or run into any issue, don’t hesitate to join the Discord: https://discord.gg/5yhY9bg
Other ways to reach out are listed on the official website
Now that you have Pentoo up and running, here are a couple of things to try: P25 Scanner using SDRTrunk for RF work, or Practical RFID Recon with Proxmark3 for hardware hacking.